Friday, December 24, 2010

Gingerbread Cookies

Its the most wonderfullll timeee of the year!! To me that means family & loves ones, lots of shopping, and even more amounts of cooking a baking. I make Gingerbread cookies almost every year. Here's the recipe I use for classic gingerbread cookies and royal icing. Merry Christmas everyone!


Gingerbread Cookies

Ingredients:

  • 5 cups all-purpose flour
  • 1/2 tsp. baking soda
  • 1 Tbs. ground ginger
  • 4 tsp. ground cinnamon
  • 3/4 tsp. ground cloves
  • 1 tsp. freshly grated nutmeg
  • 1 tsp. allspice
  • 1 1/2 tsp. salt
  • 16 Tbs. (2 sticks) unsalted butter
  • 1/2 cup firmly packed light brown sugar
  • 1/2 cup granulated sugar
  • 1 cup unsulfured molasses
  • 1 egg
  • Decorating sugars and pastes as desired

Directions:

  • Have all the ingredients at room temperature.
  • Into a bowl, sift together the flour, baking soda, ginger, cinnamon, cloves, nutmeg, allspice and salt. Set aside.
  • In the bowl of an electric mixer fitted with the flat beater, beat the butter on medium-high speed until fluffy and pale yellow, 4 to 6 minutes. Add the brown and granulated sugars and beat for 1 minute. Reduce the speed to low and add the molasses, beating until well combined, about 1 minute. Add the egg and beat until combined, about 30 seconds.
  • Add the flour mixture in 4 additions, beating in each addition before adding more. Beat just until combined, stopping the mixer occasionally to scrape down the sides of the bowl.
  • Turn the dough out onto a floured surface. Using floured hands, form the dough into a smooth mound and divide into 4 equal portions. Shape each into a disk and wrap separately with plastic wrap. Refrigerate for at least 2 hours or up to 2 days.
  • Preheat an oven to 400ºF. Line several baking sheets with parchment paper.
  • Remove 1 dough disk at a time from the refrigerator and let stand for 10 minutes. Place the dough between 2 sheets of parchment or waxed paper and roll out to a thickness of 1/4 to 3/8 inch. 
  • Press cookie cutters into dough to cut desired shape. Using an offset spatula, carefully transfer the cutouts to the prepared baking sheets. Repeat with the remaining dough. Gather up the scraps, reroll them and cut out additional cookies. For best results, do not reroll scraps more than once. Refrigerate the cookies until firm, about 20 minutes.
  • Bake the cookies until lightly browned on the bottom, about 7 min.
  • Let the cookies cool completely on the baking sheets, then decorate as desired and assemble (see tips below). Makes 4 or 5 of each type of cookie.

Royal Icing

Ingredients:

  • 3 egg whites, at room temperature
  • 4 1/2 cups confectioners' sugar
  • 1/2 tsp. cream of tartar
  • Pinch of salt
  • A few drops of vanilla extract or fresh
     lemon juice (optional)

Directions:

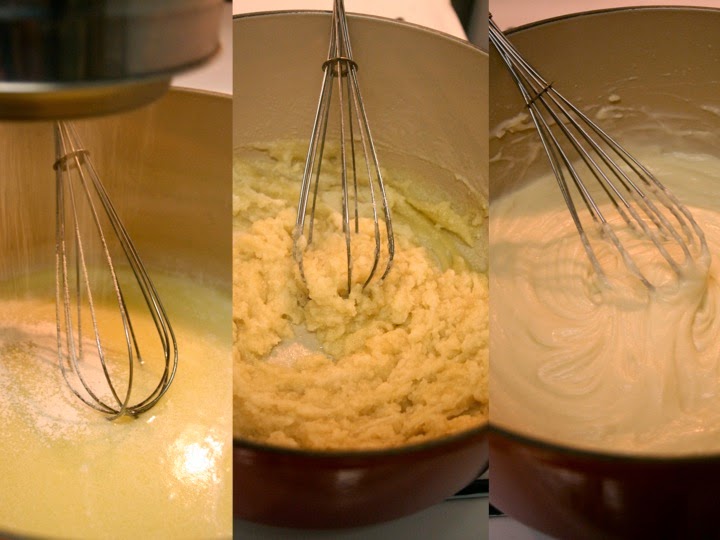
  • In the bowl of an electric mixer fitted with the whisk attachment, beat the egg whites, confectioners' sugar, cream of tartar and salt on medium-low speed until blended. Add the vanilla or lemon juice, increase the speed to medium-high, and continue beating until stiff peaks form and the mixture is nearly triple in volume, 7 to 8 minutes. 
  • Remove the bowl from the mixer, cover tightly with plastic wrap and store at room temperature until ready to use, up to 6 hours.
  • Makes 5 to 6 cups.


Wednesday, December 15, 2010

Three Cheese Baked Mac & Cheese

I have to say, this is the BEST mac & cheese I have EVER had! I take it to almost every party/potluck because it is definitely a crowd-pleaser. I figured it's about time I add it to the blog. So here we go...


Three Cheese Mac & Cheese

Ingredients
  • 8 oz butter
  • 8 oz flour
  • 3 cups of whole milk warmed
  • 12 oz sharp cheddar cheese shredded
  • 6 oz Gruyere cheese shredded
  • 6 oz fontina cheese shredded or white cheddar
  • 1 lb. elbow pasta
  • 1 cup Panko bread crumbs
  • olive oil
Method
  • In a stock pot cook the pasta half way, until al dente
  • In a second large stock pot, melt the butter and add the flour little by little (I use a sifter so that I can control the amount that falls in and reduce clumps). Cook flour until golden. This is called a "roux".
  • Slowly whisk and add the warm milk to the roux. The addition of the milk will make the consistancy change from creamy to chunky- like mashed potatoes. This is normal, just keep adding the milk little by little and keep whisking. 
  • Once smooth, whisk the cheeses in until melted.
  • Add in the pasta and season with salt n pepper
  • Transfer the mixture in to a baking casserole
  • Mix bread crumbs about about 1/2 cup shredded cheese if you still have any. Sprinkle bread crumb mixture on top and drizzle with ~ 2 tbsp. olive oil, to later create a crispy crust when you bake.
  • Bake for 30 min at 400 or until golden
  • Remove from the oven and let rest for 10 min


Candy-Cane Petit Fours

I found this recipe in BH&G Magazine (Holiday Recipes edition) and thought it was an easy and cute little treat to take to a holiday party. I made a big mistake when I bought the wrong icing (I bought butter cream which did not mix well with the white chocolate- it totally separated and was a mess!) so my cakes are covered in 100% white chocolate. Still came out good but i'm curious to see what would have happened if I mixed the two the way the recipe calls. Let me know if you decide to make this one!


Ingredients

  • 1 10.75-ounce  frozen loaf pound cake, thawed
  • 1 16-ounce can  vanilla frosting
  • 2 to 3 drops  peppermint extract
  • 1 drop  red food coloring
  • 4 ounces  white chocolate baking squares with cocoa butter, chopped
  • 1/4  teaspoon  peppermint extract
  •  54 small peppermint candy pillows (optional)
Method
  • Using a serrated knife, cut cake into ten 1/2-inch slices. Set aside.
  • For peppermint filling, in a bowl, stir together 1/4 cup of the frosting, 2 to 3 drops peppermint extract, and the red food coloring. Spread five of the cake slices with the filling. Top each with a plain cake slice, making a sandwich. Cut each sandwich into 3 pieces, starting from center of one long side and cutting to each opposite corner, making 15 triangular-shaped pieces; set aside.
  • For icing, in a small heavy saucepan, cook and stir chopped white chocolate over low heat until melted. Add remaining frosting; heat over low heat, stirring until smooth. Stir in 1/4 teaspoon peppermint extract.
  • Insert a fork into the side of a cake piece. Holding the cake over the saucepan, spoon on enough icing to cover sides and top. Using another fork, gently push the cake piece onto a wire rack set over a piece of waxed paper. If necessary, spoon icing onto side of cake where fork was inserted. If desired, arrange three peppermint candies on each cake. Repeat with remaining cake pieces, icing, and peppermint candies. Let stand until icing sets. 


Friday, December 3, 2010

Classic Tiramisu

Contrary to popular belief, Tiramisu is incredibly easy to make. It takes no time at all to put together (< 1 hour). Really, most of the time occupied by this dish is letting it set/cool, and eating it! Try this one next time you have a sweet tooth.
Ingredients:
  • 6 eggs (yolks)
  • 1 pint - real whipping cream
  • 1 large package (50+ count) - Lady fingers (use the dry italian kind)
  • 1 pound -  mascarpone cheese
  • 10 tablespoons granulated sugar
  • 4 tablespoons powdered sugar
  • 14 shots - brewed espresso (or 10 shots espresso plus 6 oz. strong coffee)
  • ~ 2-3 tablespoons- powdered cocoa
Method: 
  • Brew coffee/espresso (about 5 cups), add sugar to taste, pour coffee onto a plate and set aside, let cool slightly. 
  • Beat mascarpone cheese and 10 tablespoons of sugar until no longer granular (~3-5 min), then mix in egg yolks, set in frig mix for another 3 minutes (this mixture should be dense).
  • Take lady fingers and dip in espresso, you want the lady finger to soak up the coffee but, you do not want it to get soggy. The Lady finger should keep its shape (Error on the dry side, you do not want a soggy tiramisu).
  • In a decent size casserole pan, make a layer of lady fingers that have been dipped in espresso.
  • Take your mascarpone mixture and layer on the coffee lady fingers.
  • Do one more layer of lady fingers soaked in espresso on top of the mascarpone mixture. So after this point you should have lady fingers then cheese mixture and then one more layer of lady fingers.
  • Take your whipping cream, and mix on high until you get the fluffy consistency. When it is fluffy (~10 minutes) add powdered sugar and fold through. Try not to mix too roughly or the whipped cream will not be as fluffy. 
  • Top the tiramisu with the whipping cream
  • Sift a layer of good cocoa over the top.
  • Let sit in refrigerator at least 6 hours preferably over night. Then serve. 


Sunday, November 28, 2010

Thanksgiving Recipes

I probably should have shared these recipes before Turkey day but last week was a busy one for me. My mom does most of the cooking on thanksgiving but this year I handled the stuffing and yams. Both came out delicious! My friend Nikki and I attended a cooking class at Sur La Table a couple weeks ago, so that is where these recipes are from. Maybe you can try them next Thanksgiving!

Sourdough Stuffing with Sausage, Apples, and Golden Raisins (copyright: Bon Appétit 2009)

Ingredients:
  • 1 1/2 pound loaf sourdough bread, crusts recomed, cut into 1/2 inch cubes (about 13 cups)
  • 2 pounds bulk pork breakfast sausage (I like the maple breakfast sausage for this)
  • 2 large onions, chopped (about 4 generous cups)
  • 4 tablespoons (1/2 stick) butter, divided
  • 6 cups 1/2 inch cubes peeled Granny Smith apples (about 28 oz.)
  • 3/4 cup golden raisins (about 4 oz.)
  • 2 tablespoons chopped fresh sage (I used about double this amount of sage, plus about 1-2 tbsp. fresh thyme because that's what we did in cooking class)
  • 2 1/2 cups low-salt chicken broth (I made this twice, once with Turkey broth and once with chicken. Using Turkey broth made it sooooo much more flavorful-- highly recommend)
  • 3 large eggs
Method:
  • Preheat oven to 350 degrees and position rack in center of oven.
  • Spead bread cubes in a single layer on large rimmed baking sheat. Bake until pale golden, stirring occasionally, 15 to 20 min. Transfer bread to a very large bowl.
  • Sauté sausage in heavy large skillet over medium-high heat until cooked through, breaking into small people with back of fork, 8-10 min. Transfer to separate bowl (don't add to bread bowl yet).
  • Add onions and celery to drippings in skillet; sauté until golden brown, about 12 min. Transfer to sausage bowl.
  • Melt 2 tbsp. butter in same skillet over med-high heat. Add apples, satué until tender, about 10 min. 
  • To plum up your raisins, let simmer in shallow water for a few min.  
  • Position rack in center of oven and preheat to 350 degrees. Generously butter 15x10x2-inch glass baking dish.
  • Add apples, raisins, and sausage mixture to bread bowl. Toss. 
  • Whisk broth and eggs in medium bowl. Add egg mixture, along with thyme and sage to stuffing bowl. Toss. Season with salt and freshly ground black pepper. Toss... again.
  • Bake stuffing uncovered until top is golden and crisp in spots, 45 min to 1 hour. Let stand 10 to 15 min. and serve.
Maple-Glazed Yams with Pecan Topping  (copyright: Bon Appétit 1998)
Ingredients:
  • 4 pounds yams (red-skinned sweet potatoes), peeled, cut into 1/4 inch thick rounds
  • 1/2 cup pure maple syrup
  • 8 tablespoons (1 stick) chilled butter, cut into 1/2 inch cubes
  • 1/3 cup all purpose flour
  • 1/3 cup (packed) golden brown sugar
  • 1/2 cup coarsely chopped pecans (I used a full cup)
Method:
  • Preheat oven to 400 degrees. Butter 13x9x2-inch glass baking dish. Bring large pot of salted water to boil. Add yams. Cook until water returns to simmer, about 4 min. Drain. Rinse under cold water.
  • Arrange yams in prepared dish, overlapping slightly. Season with salt. Pour syrup over yams. Dot with 3 tablespoons butter. Cover and bake until yams are almost tender, about 25 min. 
  • Miz flour and brown sugar in medium bowl. Add remaining 5 tablespoons butter. Rub in with fingers until mixture resembles coarse meal. Mix in pecans.
  • Sprinkle pecan mixture atop yams. Bake yams until tender, about 20 min.
(sorry, forgot to take a picture of the finished product! Was too anxious to eat!!)

Sunday, November 14, 2010

Rosemary Serloin Skewers with Grilled Veggies and Risotto

Tonight we had SND (Sunday Night Dinner) with a few friends at our place. Our guests took care of drinks, dessert, and our side dish (veggies: onions, peppers, squash & cherry tomatoes to be grilled) so all I had to take care of was preparing the skewers and making risotto. Everything came out deeelish!

Skewers

Ingredients:
  • 2 fillet tips or other pieces of beef fillet, about 2 lbs total weight, cut into 3/4 inch chunks.
  • 8 large rosemary stems, stripped and trimmed to a point, or wooden skewers, soaked in water for at least 30 min.
  • 1 tbsp garlic powder
  • 2 tsp onion powder
  • 1 tbsp chopped fresh rosemary or 1 1/2 tsp dried
  • Salt and freshly ground pepper
Method:
  • Get charcoal grill, gas grill, or broiler grill (whichever) ready and preheated.
  • Thread the chinks of fillet onto the rosemary skewers, leaving a little space between the chunks so that the meat cooks evenly on all sides.
  • To make the rub: in a small bowl, mix together garlic powder, onion powder, rosemary, 2 tsp. salt and 1 tsp. pepper. Sprinkle the rub all over the meat. Let skewers stand at room temperature for at least 15 min, or up to an hour.
  • Grill or broil the skewers to desired doneness, 4-7 min. on each side. Let skewers stand for 5 min. Serve about 2 skewers per person.


Risotto:  I followed a basic parmisian risotto recipe in one of my old cookbooks. The recipie called for sauteed spinach but my spinach was looking a little wilted, so I left that out. Instead, I sauteed some mushrooms in white wine and butter and added them the the risotto right as it was finishing up. I also added the zest from one whole lemon, and the juice of half a lemon. Pretty good :)

Brentwood Farmers Market

Every Sunday I visit the Brentwood farmers market. It's such a relaxing experiance. You're out in the sun, getting fresh, organic produce, supporting your local farmers, all for a great price! Every time I go I get about a pound of grapes for $1.00. Yes! $1.00-- and they are soo sweet and delicious. How about a bag of 5 huge bell peppers for $2.00. Yep! 

Also, you aren't sacrificing selection- you can find anything you'd find at your local grocery store, in fact, sometimes I find even more options. Check out the photo of the mushrooms-- ever seen those at Ralphs? I dont think so!

If you ever have a Sunday morning free, plan to visit your local farmer's market- you wont be disappointed!


Wednesday, November 10, 2010

'Real Simple' Spinach Stuffed Mushrooms

I was flipping through the November issue of Real Simple Magazine and noticed a stuffed mushroom recipe. I wasnt really looking for anything like this, but after glancing through the recipe and ingredients, I realized I already had everything I'd need to make these. Little did I know, this recipe was the jack-pot recipe for stuffed mushrooms. They are DELICIOUS! I dont really even like mushrooms, but this has to be my new favorite appetizer/snack. Yumm... they have a slightly peppery bite from the Gruyère, the moistness from the mushroom, and the crunchiness from breadcrumbs that just turned out amazing.


Although the recipe calls for medium sized mushrooms, I used small, white button mushrooms because that's what I had. After being stuffed, about four of these little guys are only around 105 calories. Can't beat that!

Ingredients
  • 24 medium sized mushrooms (about 1 1/2 pounds)
  • 2 tablespoons olive oil, plus more for the baking sheet
  • 2 cloves garlic, finely chopped
  • 5 oz. baby spinach, chopped
  • kosher salt and black pepper to taste
  • 3/4 cup panko break crumbs
  • 1/2 cup Gruyère, grated (2 ounces)
Method
  • Heat oven to 375° F. Remove the stems from the mushrooms; finely chop the stems and reserve. Coat a baking sheet with oil. Bake the mushroom caps, stem-side down, until just tender, 10 to 12 minutes.
  • Meanwhile, heat the oil in a medium skillet over medium heat. Add the garlic and chopped mushroom stems and cook, stirring, until tender, 3 to 5 minutes. Add the spinach, ¼ teaspoon salt, and ⅛ teaspoon pepper and cook, tossing, until wilted, 2 to 3 minutes more.
  • In a bowl, combine the spinach mixture with the bread crumbs and cheese. Spoon into the mushroom caps and bake until golden brown, 12 to 15 minutes.


Wednesday, November 3, 2010

Chicken Milanese with Tomato Fennel Sauce


Yummy! You need to make this! I've had pretty good luck with Giada's recipes and this is another winner. It's the perfect balance of crispiness from the chicken and creaminess from the sauce. I decided to pair this dish with grilled asparagus drizzled in EVOO. Because the sauce is creamy, I wanted a lighter side. If you don't have asparagus i'd do broccoli or grilled bell peppers and squash. Potatoes might be too heavy.

Find the recipe: here

Oh! Also, If you decide to try this one, keep in mind that fennel is sometimes labeled as anise at the grocery store. It's the same thing. I didnt know this the first time I used fennel and it would have saved me a lot of searching in the produce section if I had know ;)  


Monday, November 1, 2010

Tomato Feta Pasta Salad

Every Sunday that we can, we get together with our good friends, Andrew and Nikki for 'Sunday Night Dinner'. Last night dinner was at their place and we (meaning I) decided to make a pasta salad to take over in addition to dessert. We were going to be barbecuing so I wanted something that would compliment chargrilled chicken, roasted peppers and squash, etc. I went to my go to source, foodnetwork.com, to find a recipe and came across Ina Garten's Tomato Feta Pasta Salad. Mmm was it good! If you like mediterannian flavors, you will love this!

I followed the recipe but made a couple changes:
  • Instead of 1 cup feta, I only used a half cup (this was plenty)
  • Instead of diced tomatoes, I used cherry tomatoes (halved)
  • Added juice from half a lemon when tossing everything together
It was deeeee-licious! It tasted so fresh and was booming with flavor. Will be making this recipe often!